Table of Contents
ToggleIf you’ve ever spent 15 minutes hunting for a 9/16″ wrench in a messy garage, you know that tool storage isn’t just about keeping things neat, it’s about saving time and protecting your investment. The Craftsman 2000 Series Tool Box has earned its reputation as a workhorse among DIY enthusiasts and homeowners tackling everything from minor repairs to full renovation projects. This guide walks you through what makes this tool box a solid choice, how to maximize its storage capacity, and how to maintain it for years of reliable use.
Key Takeaways
- The Craftsman 2000 Series Tool Box combines reinforced steel construction with a powder-coated finish that resists rust, making it a durable choice for DIY projects and long-term storage.
- Choose your Craftsman 2000 tool box size based on your tool inventory and work style—a 24-inch compact model works for light repairs, while a 28 or 36-inch option suits structural and carpentry projects.
- Organize tools by function in the shallow upper drawers for small parts and fasteners, keeping frequently used power tools at eye level to maximize efficiency and reduce project delays.
- Maintain your tool box by wiping down after each project, checking hinges quarterly, and protecting the powder-coated finish with touch-up paint to prevent rust and extend its lifespan.
- Proper drainage, ventilation, and moisture control are critical in humid climates—add desiccant packs and clear drain holes to prevent condensation and rust buildup inside your tool box.
- The Craftsman 2000 Series offers the sweet spot between cost and quality for homeowners, with optional locking caster wheels available for improved mobility and easier tool retrieval across jobsites.
What Makes the Craftsman 2000 Series Stand Out
Design and Build Quality
The Craftsman 2000 Series strikes a practical balance between durability, portability, and functionality. Unlike lightweight plastic boxes that flex under load or vintage steel toolboxes that weigh as much as a small car, this series uses reinforced steel construction combined with a powder-coated finish that resists rust and corrosion. The hinges are heavy-duty and tested to handle repeated opening and closing without sagging, a detail that separates a tool box that lasts from one that falls apart in three years.
The latch mechanism is straightforward and reliable. It’s not fancy, but it locks securely without jamming, and you can operate it one-handed even when wearing work gloves. The side handles are spaced wide enough to distribute weight evenly, reducing strain when carrying tools up a ladder or across the jobsite. All told, the build quality reflects honest engineering: no unnecessary frills, but everything is engineered to work hard and last.
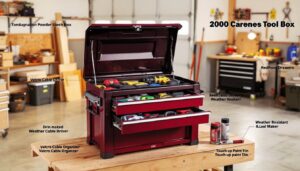
One notable aspect is the top storage compartment with shallow drawers. These are sized just right for screws, bolts, nails, and small fasteners, items that would otherwise rattle around in a deep chest. The compartments come with dividers that can be repositioned to match your inventory. This thoughtful design addresses a real problem: most DIYers spend as much time organizing small parts as they do on the actual project.
Key Features and Storage Capacity
The Craftsman 2000 Series comes in several sizes, typically ranging from a 24-inch compact model to a 36-inch full chest. The middle-ground option, usually around 28 inches wide and 16 inches deep, fits well in most garage bays without taking up excessive floor space. This size holds roughly 15,000 to 18,000 cubic inches of usable storage, depending on configuration.
The interior is divided into multiple compartments and drawers. The upper section typically includes three to four shallow drawers with adjustable dividers. The main cavity below accommodates larger tools: power drill batteries, sanders, grinders, and bulky items like a pneumatic nail gun or oscillating multi-tool. The base is reinforced to handle weight distribution without warping, critical when you’ve stacked a 40-pound impact drill next to a box of foundation anchors.
Drainage and ventilation matter more than most people think. If water or spilled coolant pools inside, tools rust. The 2000 Series includes small drain holes in the base and enough clearance to allow air circulation, reducing moisture buildup when the box sits in an unheated garage or workshop. This is especially important in humid climates where surface rust can form in weeks.
The exterior dimensions are designed to fit standard workbench heights and truck beds. The rounded top reduces the chance of pinched fingers and helps rain run off rather than pooling. Small details, but they add up to a tool box that works with you, not against you.
Choosing the Right Craftsman 2000 Tool Box for Your Needs
Start by auditing your current tools. Do you have mostly small hand tools, wrenches, screwdrivers, pliers, or do you store larger equipment like a reciprocating saw, angle grinder, or power drill? A 24-inch box works fine if you’re focused on fastening and light repairs. If you’re doing structural work, framing, or finishing carpentry, you’ll want the 28 or 36-inch option.
Consider also your shop setup. Will the tool box sit stationary on a bench, or will you roll it between projects and transport it in a truck? The Craftsman 2000 Series is heavy when full, expect 80 to 150 pounds depending on size and contents, so factor in whether you have the physical capability to move it regularly. If mobility is a priority, some models come with optional locking caster wheels: this adds cost but eliminates strain and makes tool retrieval faster.
Budget matters too. The Craftsman 2000 Series sits in the mid-range: more expensive than a basic plastic contractor’s box but less costly than industrial-grade cabinets. For a homeowner doing occasional projects, the mid-size model with standard wheels is usually the sweet spot. For someone running a home-based carpentry or contracting business, investing in the larger chest with casters and additional accessories makes sense. Guides from experienced DIYers on platforms like Bob Vila often weigh the same trade-offs and can help you decide based on your specific workflow.
Organization Tips for Maximum Efficiency
An empty tool box is just a box. The real value emerges when you organize it thoughtfully. Start by grouping tools by function: fastening (screwdrivers, bit holders), gripping (pliers, adjustable wrenches), measuring (tape measures, levels, squares), and striking (hammers, mallets). This mirrors how your brain searches for tools during a project.
Use the shallow upper drawers for consumables and small parts. Dedicate one divider to common fasteners, wood screws in various gauges, drywall anchors, galvanized nails, organized by size. A second might hold bits and blades: drill bits, driver bits, saw blades, and router bits. A third could house measuring tools: chalk lines, pencils, marking gauges. This prevents rummaging.
For the main cavity, store frequently used power tools at eye level or slightly lower. Tools you reach for multiple times per project (your power drill, impact driver, or sander) should not be buried under less-used equipment. Heavier items belong near the bottom. Position lightweight items like safety gear and accessories where they won’t shift and pinch fingers.
Consider drawer organizers and trays. Heavy-duty plastic bins with labeled tabs cost less than you’d think and transform a jumbled cavity into organized zones. Velcro cable organizers keep power cords from tangling. Family Handyman offers excellent tutorials on workshop organization that apply directly to tool box setup.
Label everything. A label maker and a few minutes of work now saves hours hunting later. This is especially true if multiple people use the same tools, it sets clear expectations about where items belong.
Maintenance and Longevity
Tool box longevity depends on consistent maintenance. After each major project, wipe down the exterior and interior with a dry cloth to remove dust and sawdust. Sawdust is hygroscopic, it absorbs moisture, so if it accumulates, it creates a damp environment where rust forms.
Check the hinges and latch quarterly. Tighten any loose bolts with the appropriate wrench or allen key. If you notice the top doesn’t close flush or the latch sticks, address it immediately. Hinges that fail mid-project are a safety hazard, and a latch that doesn’t secure means tools can spill.
For the powder-coated steel finish, avoid using harsh solvents or wire brushes that strip the coating. If the finish gets scratched, apply touch-up paint or a clear protective coat to prevent rust from starting at that spot. A small tin of matching paint costs a few dollars and extends the life by years. The interior should be checked seasonally in humid climates: if condensation pools, improve airflow and consider placing a desiccant pack inside to absorb moisture.
If tools are stored long-term, coat any exposed metal surfaces lightly with machine oil or tool protection spray. This prevents flash rust. Before using stored tools, wipe away the protective coat to avoid getting oil on your workpiece or electrical components. This extra step takes 10 minutes and can mean the difference between a reliable tool and one that’s seized or corroded. For detailed maintenance guidance, resources like Fix This Build That provide step-by-step workflows for tool care and workshop preservation.
Conclusion
The Craftsman 2000 Series Tool Box works because it prioritizes function over flash. It’s built to last, sized for real projects, and organized in a way that supports efficient work. Whether you’re a casual DIYer maintaining your home or a more serious hobbyist tackling furniture builds and renovations, choosing the right size, keeping it organized, and maintaining it consistently ensures your tools stay protected and accessible for years. Invest in the box that matches your current toolkit and room to grow, and then spend the time organizing it properly. That’s where the real payoff comes.